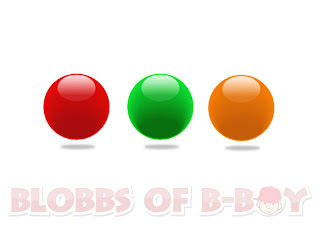
Wow I didn't imagine that I would make my first ever Design tutorial specifically Illustrator tutorial, I myself is a Graphic Designer for a Clothing company and the past few years I've been reading a lot of different photoshop tutorials and illustrator tutorials and now because I'm beginning to be active again in blogging, I've thought of sharing some of the things I know about Graphic designs.
How to make a Simple Glossy orb effect in Illustrator?
For today I have decided to do a tutorial on making a Simple Glossy orb effect in Illustrator, I know that there are a lot of ways to do a Glossy orb effect out there but I'll show you a simple way to do it, as you all know that this is my first illustrator tutorial so please bare with me :). I'm Using Adobe Illustrator CS3 but this is also applicable to lower and higher version.
STEP 1
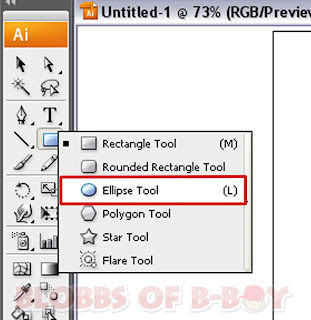
The first step will be Opening a New Document, you could choose any size that you want. After that go to your tools its the sidebar on your left, then select the Ellipse Tool or Press L on the keyboard.
(See Image below)
STEP 2
Now just drag down the mouse and make a perfect circle on your art board, In order for you to make a perfect circle, hold down SHIFT button on your keyboard while dragging down your mouse cursor.
(see image below)
STEP 3
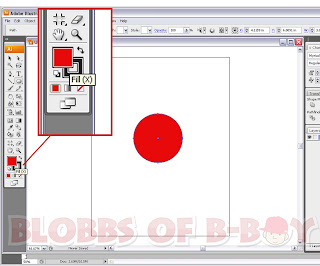
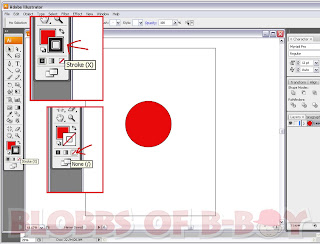
In order for you to add any color you like to your circle just click the FILL Palette (just like in the first image below) then you can now choose the color you like to use. have you noticed that there is a black outline in your circle, we don't want that included in our design, to remove this, click the STROKE Palette it is just beside FILL Palette, after clicking this you need to click also the small icon below it, the Red diagonal icon(as seen in the image below) in order for the black outline to be removed.
STEP 4
Now go back to your ELLIPSE Tool and make another circle (a small one) but this time a distorted one or an oblong shape, (so don't hold down the shift button) make sure to choose a darker shade of your main color and place that circle below the main circle. After that select both circles by holding SHIFT and clicking the two circles, it is important that you select it both. Now you're done selecting both circles so go to OBJECT>BLEND>MAKE, or simply press ALT+CTRL+B, now you'll be having a color blend between your main circle and the darker shade of circle.
(See image below)
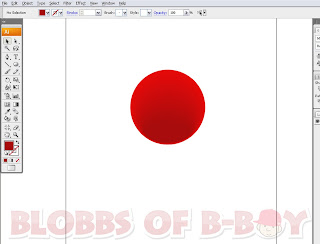
This should be the outcome of this step.
STEP 5
We're almost done guys.
For the next step, again you'll be using the ELLIPSE Tool and make another distorted circle and this time the color that you'll be using is white and place that circle on the upper portion of your main circle (as seen on the image below).
STEP 6
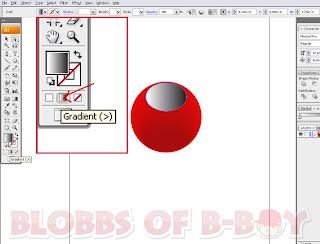
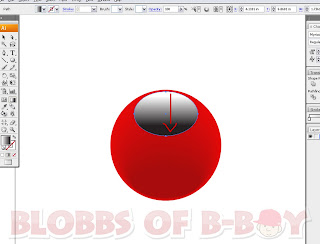
After doing Step 5, click on the Gradient Palette (as seen on the image below) after clicking it you now choose your Gradient Tool,(as seen on the image below) Don't be confused about the two, just look at the image, but remember in order for you to do this you should be selecting first the circle that you just created, now you have choose your Gradient Too,l you point your mouse cursor on the circle you just made and drag from top to bottom it should look like on the image below, the white on top and the black on the bottom part.
STEP 7
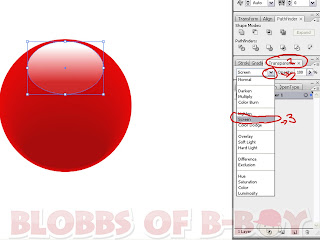
Now you're done with all the Gradient thingies before going to the next step, remember that the Circle with gradient is still the one you will adjust for this step. Go to TRANSPARENCY tab, It's located on the right side corner, then go to Blending Options and choose SCREEN, and it would gift you a shining effect on your orb. For me the shining effect is too bright so we should lessen a bit by lowering the OPACITY, It's up to you on how much OPACITY you will use and if you're fine with a 100% OPACITY, It's ok also.
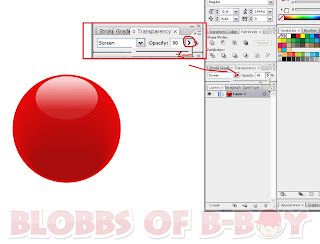
And Guess what we're DONE with our Simple glossy orb effect for your logo. to add more Identity to your Icon, you can add the first letter of your logo on the glossy orb, just like what I did, and you could also use icons that represents your logo like musical note, microphone, pen, etc.
Hope that you like my illustrator tutorial and If you have any questions or you need to clarify something about the step by step tutorials feel free to comment below or if you want you can share this to your friends.




13 comments:
i will try these 1.
@Anciro- sure, if you have any questions, just ask me, I'll be glad to answer them. Thanks for dropping by.
Great! I would try this one.
This is very helpful. I am trying to learn stuffs about Illustrator and this is very timefly. Thanks for visiting my Baul ni Noel blog.
@Jomar-Go ahead bro, thanks for visiting
@noel-if you have any questions about illustrator you could ask me, thanka for visiting
Hey.. Its mokx.. but you can call me with my real name. Ian. Uhm.. make your blog to have only two columns. ^_^..
Thanks for dropping by mokx and thanks for rge suggestion
Wow.. gusto ko itong tutorial mo Blobber boy :) sya nga pala I added na rin you sa friends page ko :)
thanks for sharing this! I almost forgot everything I learned in photoshop when I was still studying. Ok tong refresher course. hihihi!
@good filipino- salmat ng marami hehe, and slmat sa pag add sakin
@Maldita-you're welcome, maybe I'll be posting more tutorials in the future :)
hello Blobber-Boy, thanks for visiting my blog. I've already linked you in my blog as you requested. thanks and good day
@Limferdi-thanks for visiting and linking my blog :)
can you include on how to create banner, how to modify a picture, and how to create a caricature?
Post a Comment